Showing posts with label diamond. Show all posts

Building Roads Green

Engineers and architects have choices of the material and products they use to design projects – when it comes to a building frame the choice is typically between concrete, steel and wood; for paving applications the choice is generally between concrete and asphalt. Material choice depends on several factors, including first cost, life cycle cost and performance or a specific application. Due to growing interest in sustainable development engineers and architects are motivated more than ever before to choose materials that are more sustainable.

Green Concrete is one such sustainable material but it will cause extreme abrasive action once the physics of cutting begins. The slurry generated by green concrete is equally as abrasive and will require special undercutting protection for the steel core of the diamond blade. Typically, cutting control joints of highways, industrial floorings, driveways and similar projects is performed during this state. Gila's diamond blades are perfect for cutting green concrete because they are designed for abrasive materials with maximum performance and long life. The narrow U-Slot gullet design allows for quick and efficient debris removal to provide faster cutting action. This diamond blade feature tough wear-resistant bonds and drop segments provide under-cut protection for use with abrasive materials.

Green Concrete is a term given to a concrete that has had extra steps taken in the mix design and placement to insure a sustainable structure and a long life cycle with a low maintenance surface.

The first step in creating Green Concrete is to waterproof it. This stabilizes the concrete to inhibit the internal chemistry from reacting with the atmosphere, which causes surface degradation problems. Waterproofing concrete will prevent contaminants to enter the matrix and form corrosion cells on the reinforcing steel. Rust on steel occurs when the pH of the concrete drops below 11.5 thus destroying the protective layer on the steel. Stabilized concrete reduces the moisture and oxygen content, which are two of the four ingredients that facilitate corrosion.

Concrete will last longer and will not need a repair or replacement if protected from the start. This makes it  sustainable, or more commonly termed as "Green."

Posted in , , , , , | Leave a comment

Brick Steps 101

Home improvements don’t always happen inside the house—like in kitchens, bathrooms, and bedrooms—there are a wide variety of tips, tools, and ideas out there to extend DIY projects outdoors as well as indoors. Investing in a good diamond blade like the Gila Tools Super Duty Turbo Blade can open up a world of DIY opportunities for your home. This diamond blade is engineered for cutting Cured Concrete, Reinforced Concrete, Roof Tile, Concrete Pipe, Hard Brick/Block, Refactory Brick, Pavers, Natural Stone, Asphalt, Asphalt overlay on Concrete, Green Concrete and Masonry Materials—which means you can do and build just about anything!

A really nifty home improvement project for your outdoors area is installing brick steps. Brick steps instantly add that classic touch to the overall look or impact of your home. Not only that, they are the kind of fixtures that are build to last decades, even generations, if done right. So take your trusty diamond blade and turn your attention to these timeless tips for building your own brick steps.

Tip #1: Use special 1.5-inch-thick paving brick designed to be laid horizontally on the ground. These paving bricks should be fired in the kiln at a high temperature for a significant amount of time. So that ice, snow and countless freeze-thaw cycles will not deteriorated the brick.

Brick steps with help of diamond blade
Tip #2: Traditional brick steps are actually built as two sets of steps. There is the set of brick stairs you see, and the one underneath the finished brick. The set of steps underneath is built using concrete block.

Tip #3: Pour a concrete pad that acts as the foundation for the brick steps so that the brick steps will not crack or crumble despite the heavy weight. This concrete pad should be 6-inches thick and have one-half inch steel reinforcing bars spaced at one-foot centers placed in a grid pattern like a crossword puzzle. The steel should be placed in the middle of the wet concrete. Take the time to make sure this concrete is poured on compacted ground, and the finished surface of the concrete is level.


Tip #4: Use different sized concrete block and concrete brick to build the set of steps that have the same width, depth and tread height as the finished brick steps. It is important that the first set of concrete block steps are level side to side and that the treads tilt forward so water runs down each step to the patio. Engineer a tilt of one-eighth inch per foot of fall to each tread to achieve good drainage. You don't ever want water to pool on a stair tread.
Brick Step using Diamond Blade
Tip #5: Keep cuts to a minimum. Only make cuts on the sides of each tread where the brick steps butted up to small brick retaining walls on either side of the steps.

Tip #6: Do not use traditional brick mortar. Use mortar that is a mixture of fine sand and Portland cement.  Portland cement is formulated to withstand ice and snow when mixed, installed and cured properly. I used a blend of three parts sand to one part Portland cement for my mortar.

Tip #7: When creating the 6-inch riser height for each step, place the brick on its narrow edge so the flat part of the brick creates the riser face. The bottom edge of the brick should flush with the back brick of the tread below. The one-half-inch wide mortar joint between the top of the riser brick and the flat tread brick above adds up to 2 inches exactly.

And there you have it! Seven trusty tips for your own set of classic brick steps!

Posted in , , , , , , | Leave a comment

Basic Information On Tuckpointing

The process of repairing a mortar joint in a brick wall is traditionally called "tuckpointing." The term comes from the process of tucking mortar into the damaged mortar joint. Tuckpointing is a critical maintenance task and keeps water from entering the brick wall cavity. If water is allowed to get past the mortar and into the wall, brick failure may occur such as cracking or spalling (popping off of the brick face).

Diamond blades for tuckpointing are primarily used for the removal of deteriorated mortar joints for the preparation of masonry surfaces such as concrete, brick, block and stone. Whether you are looking for a triple sandwich blade or a laser crack chaser blade, Gila Tools has the right diamond blade to match your specific needs. All our diamond blades are composed of a heat-treated steel core with premium quality diamonds on its periphery to give you fast cutting speeds, faster cooling and a longer blade life for optimum performance.

Repairing a mortar joint is more common than having to replace a brick. The mortar joint plays a significant role in the structure and structural integrity of the wall. It holds the bricks together, it bears the compressive weight of the wall just as the bricks, and it keeps water out of the wall. It is also the weak link in the brick wall system because if water is allowed to get past the mortar and into the wall, brick failure may occur such as cracking or popping.

Tuckpointing is a way of using two contrasting colors of mortar in brickwork, one colour matching the bricks themselves, to give an artificial impression that very fine joints have been made. In some parts of the United States and Canada, some confusion may result as the term is often used interchangeably with "pointing" (to correct defects or finish off joints in newly laid masonry) and "repointing" (to place wet mortar into cut or raked joints to repair weathered joints in old masonry).

Repointing is the process of renewing the pointing (the external part of mortar joints) in masonry construction. Over time, weathering and decay cause voids in the joints between masonry units (usually bricks), allowing the undesirable entrance of water. Water entering through these voids can cause significant damage through frost weathering and from salt dissolution and deposition. Repointing is also called pointing, or pointing up, although these terms more properly refer to the finishing step in new construction.

Posted in , , , | Leave a comment

Basic Earthquake Rescue Techniques & Tools

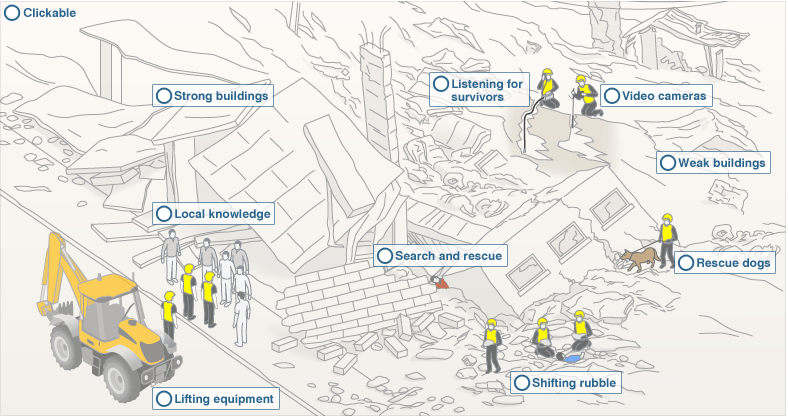
Following are basic earthquake rescue techniques and tools to help us understand how rescue operations are conducted and what we can do to help; like providing rescue tools such as diamond saw blades like the 911 Demolition Blades (Gilatools) and supporting rescue teams by giving them important information regarding the affected areas.

rescuing using diamond tools


1. Work with the Locals. Local people often know the best locations to begin the search for survivors. After speaking to them rescue workers can quickly select the most promising place to begin their work.

2. Shifting Rubble. Heavy-lifting equipment is often in short supply, leaving some rescuers little option but to shift rubble by hand or with pick-axes and shovels. Other tools used by rescuers include chainsaws, disc-cutters, diamond blades, and rebar cutters - which can be used to tackle the metal bars in reinforced concrete.

3. Lifting Equipment. Diggers (here pictured in India) and hydraulic jacks are among the heavy machinery that rescue workers employ to shift rubble. Large concrete slabs on the outside of buildings can be pulled aside by diggers, enabling rescuers to get a view of any people still trapped inside.

4. Rescue Dogs. Dogs are extremely effective at using their sense of smell to pick up on signs of life that human rescuers cannot. They are also able to cover large areas quickly, speeding up the search and rescue process.

5. Looking In Strong Buildings. Rescue workers need to be swift to assess where they are most likely to find survivors inside collapsed buildings. Stairwells or the spaces under large concrete beams can provide what rescue workers call 'voids'. It is in places like these that the living can be found.

6. Checking Weak Buildings. Many of the buildings in Haiti are made of flimsy materials. Buildings like these are quick to collapse in an earthquake but their lightweight and low height can give people a relatively good chance of getting out.

7. Listening for Survivors. Specialist sound equipment can detect the faintest of noises to within a few metres. Silence on the site is needed while a member of the rescue team bangs three times and hopes to hear a response. Carbon dioxide detectors can be used to find survivors rendered unconscious. They work best in confined spaces where they detect the greater CO2 concentration in the air exhaled by those still breathing.

Posted in , , , , , , | Leave a comment

Search

Swedish Greys - a WordPress theme from Nordic Themepark. Converted by LiteThemes.com.